
Close Menu
  • Support Us
  • Login
  • Newsletter
  • News
  • Features
  • Interviews
  • Reviews
    • Video Games
      • Previews
      • PC
      • PS5
      • Xbox Series X/S
      • Nintendo Switch
      • Xbox One
      • PS4
      • Tabletop
    • Film
    • TV
    • Anime
    • Comics
      • BOOM! Studios
      • Dark Horse Comics
      • DC Comics
      • IDW Publishing
      • Image Comics
      • Indie Comics
      • Marvel Comics
      • Oni-Lion Forge
      • Valiant Comics
      • Vault Comics
  • Podcast
  • More
    • Event Coverage
    • BWT Recommends
    • RSS Feeds
Facebook X (Twitter) Instagram
Support Us
But Why Tho?
RSS Facebook X (Twitter) YouTube Instagram Bluesky
Trending:
  • Features
    Gorr the God Butcher - Marvel Rivals

    Gorr the God Butcher Breaks Into ‘Marvel Rivals’ And Leaves No Survivors

    09/11/2026
    BlizzCon 2026 Key Art

    5 BlizzCon 2026 Predictions That Will Most Certainly Come True… Right?

    09/11/2026
    Best Marvel Video Games

    Marvel’s Top 15 Video Games of All Time

    09/11/2026
    Final Fantasy VII Remake Trilogy

    Could Final Fantasy VII Remake Trilogy Reaffirm a post-mortem Anecdote to its Origins?

    09/10/2026
    Mike Tomlin on the Today show

    I Really Want To See Mike Tomlin’s Minecraft City

    09/08/2026
  • K-Dramas
  • Gamescom
  • Game Previews
  • Sports
  • TCG
But Why Tho?
Home » BOOM! Studios » REVIEW: ‘BRZRKR,’ Issue #4

REVIEW: ‘BRZRKR,’ Issue #4

Collier "CJ" JenningsBy Collier "CJ" Jennings07/28/20213 Mins Read
BRZRKR #4
Share
Facebook Twitter Pinterest Reddit WhatsApp Email

BRZRKR #4

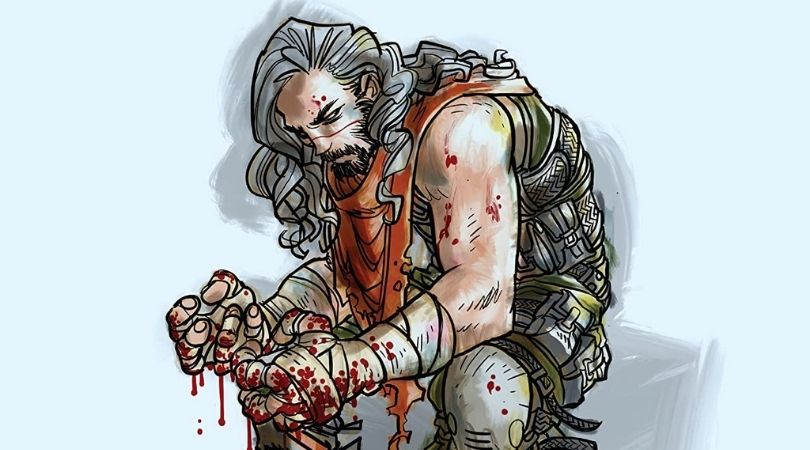
BRZRKR #4 is written by Keanu Reeves and Matt Kindt, illustrated by Ron Garney, colored by Bill Crabtree, and lettered by Clem Robbins. It is published by BOOM! Studios. In the same vein as BRZRKR #3, the story flashes back to B’s past and the tragedy that shaped him into the man he became. Further complicating matters, the entire flashback occurs within the form of a recorded therapy session with B’s government-mandated therapist Diana.

Get BWT in your inbox!

Subscribe to our weekly newsletter and get the latest and greated in entertainment coverage.
Click Here

Get BWT in your inbox!

Subscribe to our weekly newsletter and get the latest and greated in entertainment coverage.
Click Here

In my review of BRZRKR #3, I mentioned that it was my favorite issue of the series to date due to the fact that it unveiled more of B’s backstory and gave him actual pathos. Here, that trend is continued but only at the halfway point, which also reveals the extent of B’s healing factor. The first half mostly regurgitates information we’ve learned before: B’s origin, his contentious relationship with his father, and his connection with his mother. This has the unfortunate event of making the issue feel like it’s dragging, which is dangerous considering this series is slated to be twelve issues in length. I understand that Reeves’ pedigree is a large draw for the series and will lead to film and anime adaptations at Netflix, but that can only take the series so far. Future issues need to push the narrative forward and introduce more conflict for B, which I hope Reeves and Kindt have considered while writing the series.

Writing aside, the artwork continues to be a major standout of the series-especially with the fight sequences. Garney takes the title quite literally in this issue, especially with the flashbacks. B rips off limbs, shrugs off swords and spears to the abdomen, and even has a rather gruesome moment with a horse that has to be seen to be believed. He also draws a massive splash page that features B leaping at a horde of invading barbarians while holding a flaming sword and spear, uttering a feral cry as he does. Even Robbins’ lettering is a standout: the jagged shape of B’s word balloons and the arrangement of the letters feels primal and fitting of a berserker.

The other half of the artistic team sets the mood with his colors. Under Crabtree’s watchful eyes, two different colors set the difference between past and present: red and blue. Many of the flashback scenes boast reddish-orange tones that fit perfectly with B’s enraged killing sprees and the rivers of blood he’s left in his wake. Blue represents the present and is a more calming and somber affair as B and Diana discuss his past. One page even cuts between the two, as Diana weighs the gravity of everything B has told her with a sequence where B fully regenerates from a collection of grievous wounds; the colors and scenes provide a wonderful contrast, and I would have liked to see more of that throughout the issue.

BRZRKR #4 spins its narrative wheels for half the issue, with the series’ intense action sequences covering up a lack of plot advancement. With the issue ending on a surprising meeting between B and Diana, I hope that this series pushes the narrative forward in the next issue or manages to justify its twelve-issue run in the end.

BRZRKR #4 is available now wherever comics are sold.

BRZRKR #4
3.5

TL;DR

BRZRKR #4 spins its narrative wheels for half the issue, with the series’ intense action sequences covering up a lack of plot advancement. With the issue ending on a surprising meeting between B and Diana, I hope that this series pushes the narrative forward in the next issue or manages to justify its twelve-issue run in the end.
  • Buy via ComiXology Affiliate Link

Share. Facebook Twitter Pinterest LinkedIn WhatsApp Reddit Email
Previous ArticleREVIEW: ‘The Old Guard: Tales Through Time,’ Issue #4
Next Article REVIEW: ‘Astonishing Times,’ Issue #1
Collier "CJ" Jennings
  • Website
  • Facebook
  • X (Twitter)

Born and raised in Texas, Collier “CJ” Jennings was introduced to geekdom at an early age by his father, who showed him Ultraman and Star Trek: The Next Generation. On his thirteenth birthday, he received a copy of Giant Size X-Men #1 and dove head first into the realm of pop culture, never looking back. His hobbies include: writing screenplays and essays, watching movies and television, card games/RPG’s, and cooking. He currently resides in Seattle.

Related Posts

Ghostlore #1

REVIEW: ‘Ghostlore,’ Issue #1

05/10/2023
MMPRTMNT II #1 - But Why Tho

REVIEW: ‘Mighty Morphin Power Rangers/Teenage Mutant Ninja Turtles II,’ Issue #1

12/28/2022
Nahiri The Lithomancer #1

REVIEW: ‘Nahiri The Lithomancer,’ Issue #1

11/30/2022
Once upon a Time #1

REVIEW: ‘Once Upon A Time At The End Of The World,’ Issue #1

11/23/2022
Mighty Morphin' Power Rangers #101

REVIEW: ‘Mighty Morphin’ Power Rangers,’ Issue #101

10/26/2022
Eve: Children of the Moon #1

REVIEW: ‘Eve: Children of the Moon,’ Issue #1

10/18/2022

Get BWT in your inbox!

Subscribe to our weekly newsletter and get the latest and greated in entertainment coverage.
Click Here
TRENDING POSTS
BlizzCon 2026 Key Art Features

5 BlizzCon 2026 Predictions That Will Most Certainly Come True… Right?

By Mick Abrahamson09/11/2026

BlizzCon 2026 is just days away. The fake leaks are flying everywhere across Blizzard’s different…

Brett Goldstein in Ted Lasso Season 4 Episode 6
6.5
TV

REVIEW: ‘Ted Lasso’ Season 4 Episode 6 — “Don’t Jump Around Much Anymore”

By Adrian Ruiz09/09/2026

. Ted Lasso Season 4 Episode 6 gives nearly everyone room to grow while keeping Keeley trapped in a romantic story that should have been left behind.

Razer Wuthering Waves collaberation Product Review

‘Wuthering Waves’ X Razer Brings Solaris-III To Your Gaming Space

By Charles Hartford09/11/2026

Wuthering Waves X Razer’s mouse mat keyboard, and mouse bring quality performance and one of WuWa’s iconic characters to your computer space

Avatar: Seven Havens keyart News

Paramount+ ‘Avatar: Seven Havens’ Trailer Out Now + Premieres October 9th

By Matt Donahue09/11/2026

Paramount+ has shared the trailer for its new ATLA series, Avatar: Seven Havens along with and its episode schedule following its release date.

But Why Tho?
Facebook X (Twitter) Instagram Pinterest RSS YouTube Twitch
  • CONTACT US
  • ABOUT US
  • PRIVACY POLICY
  • SUBSCRIBE TO OUR NEWSLETTER
  • Review Score Guide
Sometimes we include links to online retail stores. If you click on one and make a purchase we may receive a small contribution.
Written Content is Copyright © 2026 But Why Tho? A Geek Community

Type above and press Enter to search. Press Esc to cancel.

But Why Tho Logo

Support Us!

We're able to keep making content thanks to readers like YOU!
Support independent media today with
Click Here